Digital Classroom Cleanup 101

Written by Katie Bradford
Associate Director of Professional Development
Five Star Technology Solutions
Phew. It has been a year. The good news is summer break is in your sights, and you’re ready to start winding down the school year. But if you’re anything like me as a teacher, at the end of a hectic school year my classroom needed a major cleanup. I would spend time reorganizing my bookshelves and going through any papers or files to either shred them, toss them, or put them in labeled folders. I’d spend time looking back through my curriculum and lesson planning materials, bookmarking pages, resources, and lessons that worked well and try to put them in order so I could easily find them again in the following school year. In many ways, I’d “Marie Kondo” my classroom – if it sparked joy or spoke to my teacher heart, I’d reflect on it, organize it, and keep it for the following year.
This year our “classrooms” became much more than just the physical space students occupied. In addition to your brick-and-mortar classroom, learning spaces expanded to a digital classroom as well. For many educators, planning, teaching, and learning in a digital space made many of us feel like first year teachers who hadn’t quite figured out a solid routine for organizing their teaching and learning materials. Plus, there just was not time to develop and maintain a totally new organizational routine in our digital spaces. If the idea of tidying up your digital teaching and learning materials is a little overwhelming to you, I’m here to help. Here you’ll find my end-of-year digital classroom cleanup tips for refreshing and reorganizing your Google Drive and Google Classrooms.
Get (and stay!) Organized in Google Drive
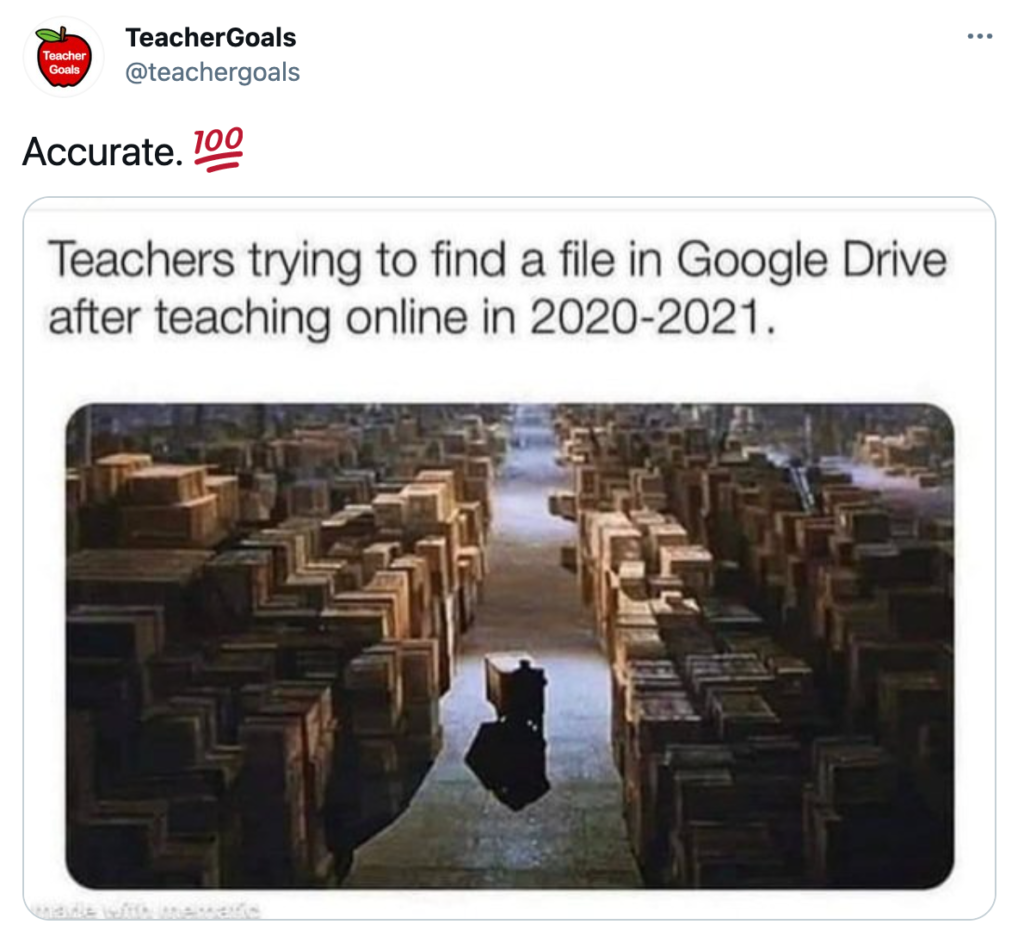
If your Google Drive is currently nothing short of a hot mess, you’re not alone. After a year and a half of transitioning most of your lessons to digital learning materials, it’s likely there are files and folders just floating around in your Google Drive without dedicated names, spaces, or even a clear purpose. Here are some simple ways to begin organizing your Google Drive.
1. Create a folder specifically for this school year. It may be helpful to title it something similar to “2020-2021 School Year.” Use this folder to organize all other folders and documents you created and used this year.
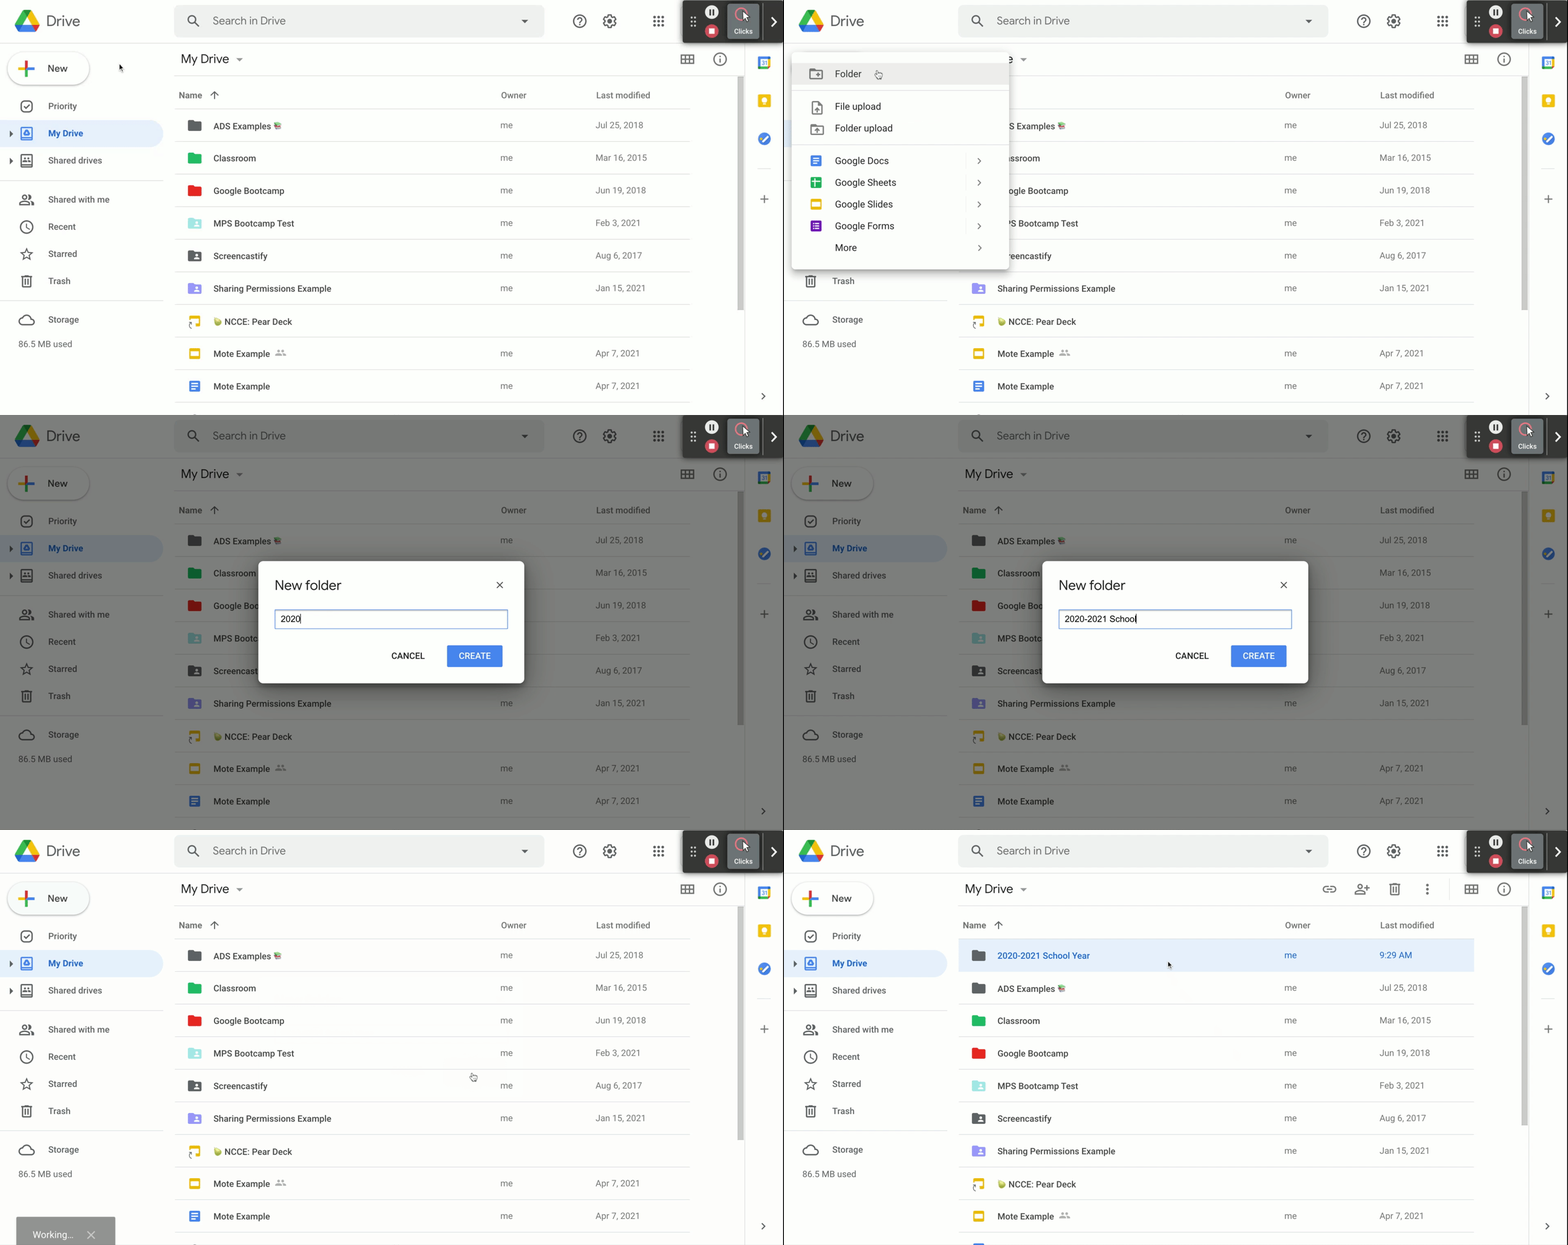
As you create your folders, don’t forget that you can easily change the color of your folders to easily distinguish and recognize different folders. It may be helpful to consider associating specific colors for specific subjects or units. For example, I might make any science-related folders green. See how to Color Code Folders here!
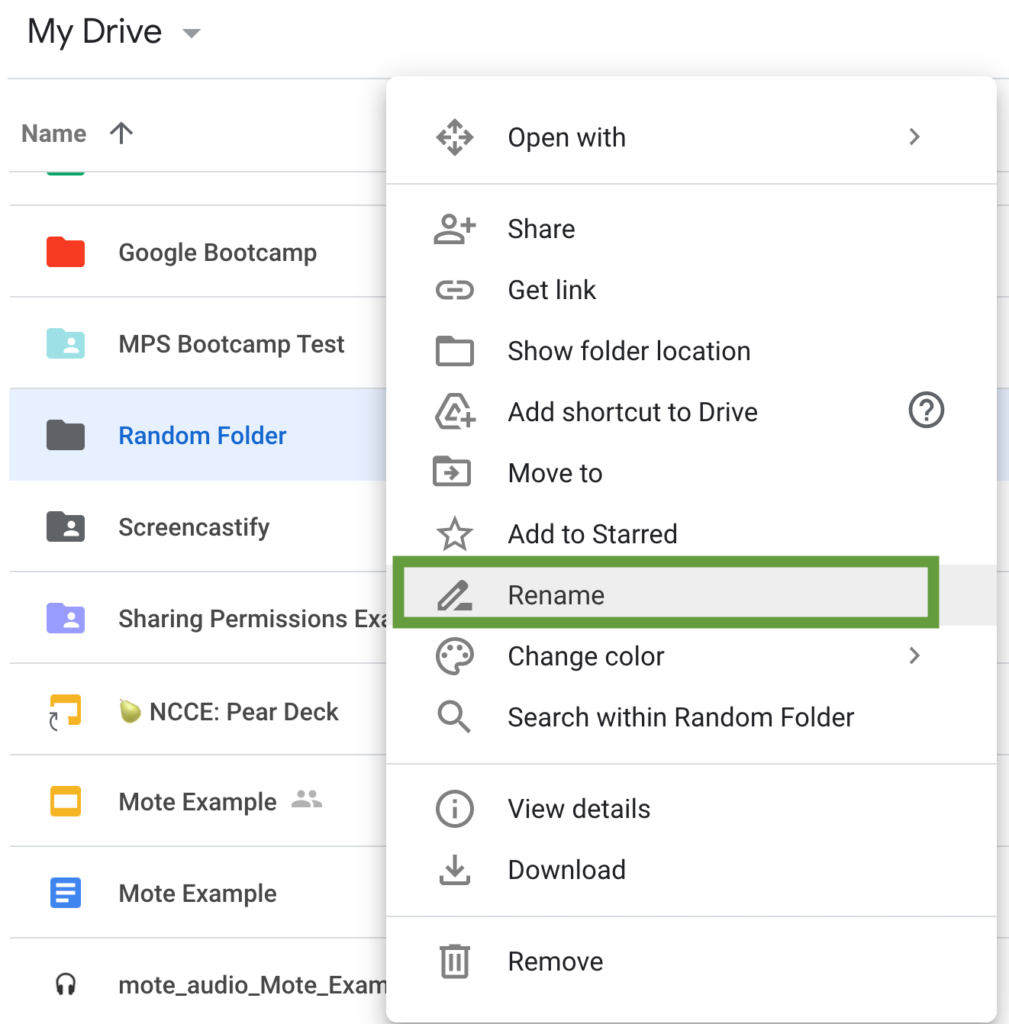
2. Rename any untitled or vaguely titled files and folders. The more specific you can be with your titles, the easier it will be to find them in the future. It may be helpful to develop a naming convention and stick to it. You may start the title with a chapter number or name or a unit title and then specify even further by adding the lesson title or resource name. Here’s an example: Figurative Language: Similes and Metaphors Lesson 1. Easily rename your files and folders by right-clicking on the resource and selecting “Rename.”
As you rename your files and folders, it might be helpful to add icons or emojis to the titles to aid in quick visual recognition. Google Drive users can easily add emojis to their files and folders by using keyboard shortcuts (Control + Command + Space on a Mac or the Windows button + the period on a Microsoft device) or by quickly copying and pasting from a website like emojipedia.org. See more here!
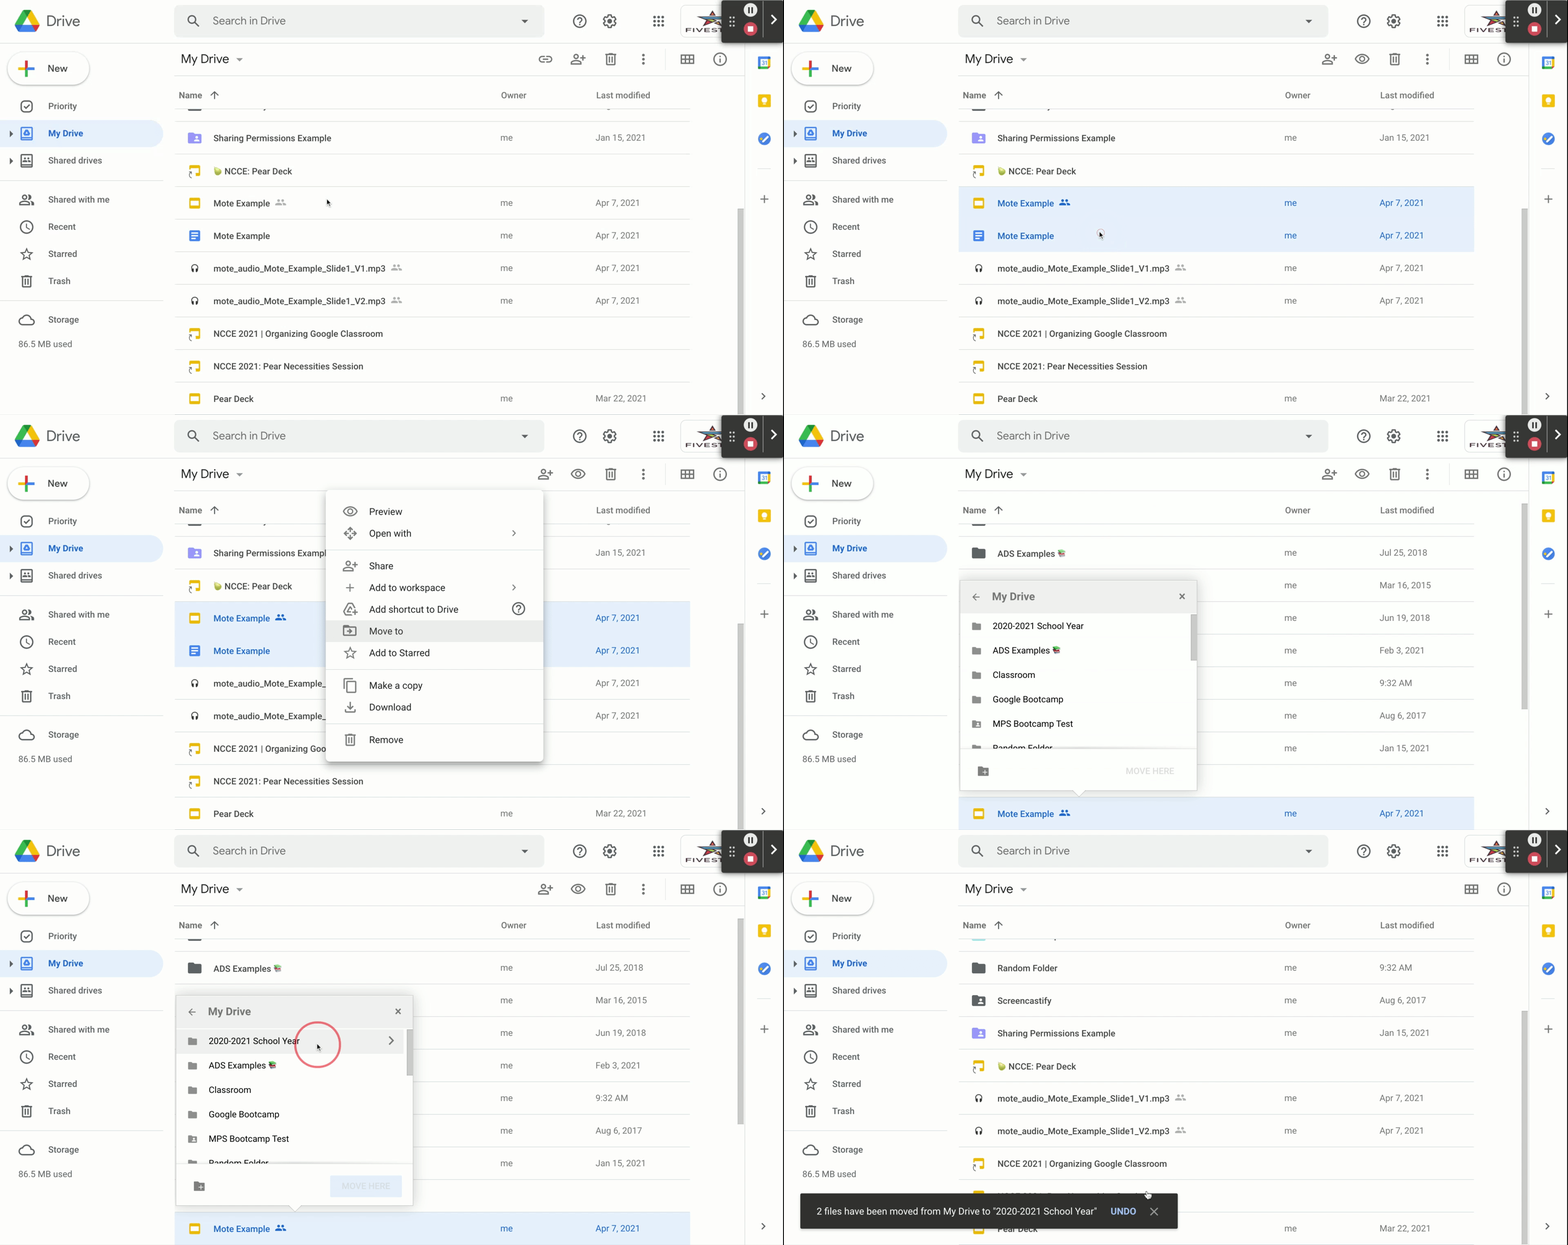
3. Organize all of the loose documents, slides, sheets, and files by moving them to appropriate folders. If you have files that don’t seem to go anywhere specific, create a folder titled “Past Documents” or “Archived Resources” and move them there to declutter your main Google Drive. Remember the Marie Kondo mantra: If it doesn’t spark joy, get rid of it! It’s ok to delete files and folders you know you truly will not need in the future.
One other lesser-known organization feature in Google Drive that can come in handy as you’re doing your digital reorganization is the ability to add files to more than one folder in Google Drive. Just select the file or folder you want to add to a second location, press Shift + Z, and then select the location in Google Drive you’d like to add it to. Watch a helpful YouTube video here!
4. Don’t forget the “Shared With Me” section of Google Drive. If you’re anything like me, the “Shared With Me” part of Google Drive stresses you out. It seems like an endless mess of files and folders I may not have even used or wanted access to, but buried somewhere in this pile of digital documents are resources you will want to have quick access to in the future. While this section of Google Drive can’t be truly organized per se, you can create shortcuts to files and folders you will need to easily access later.
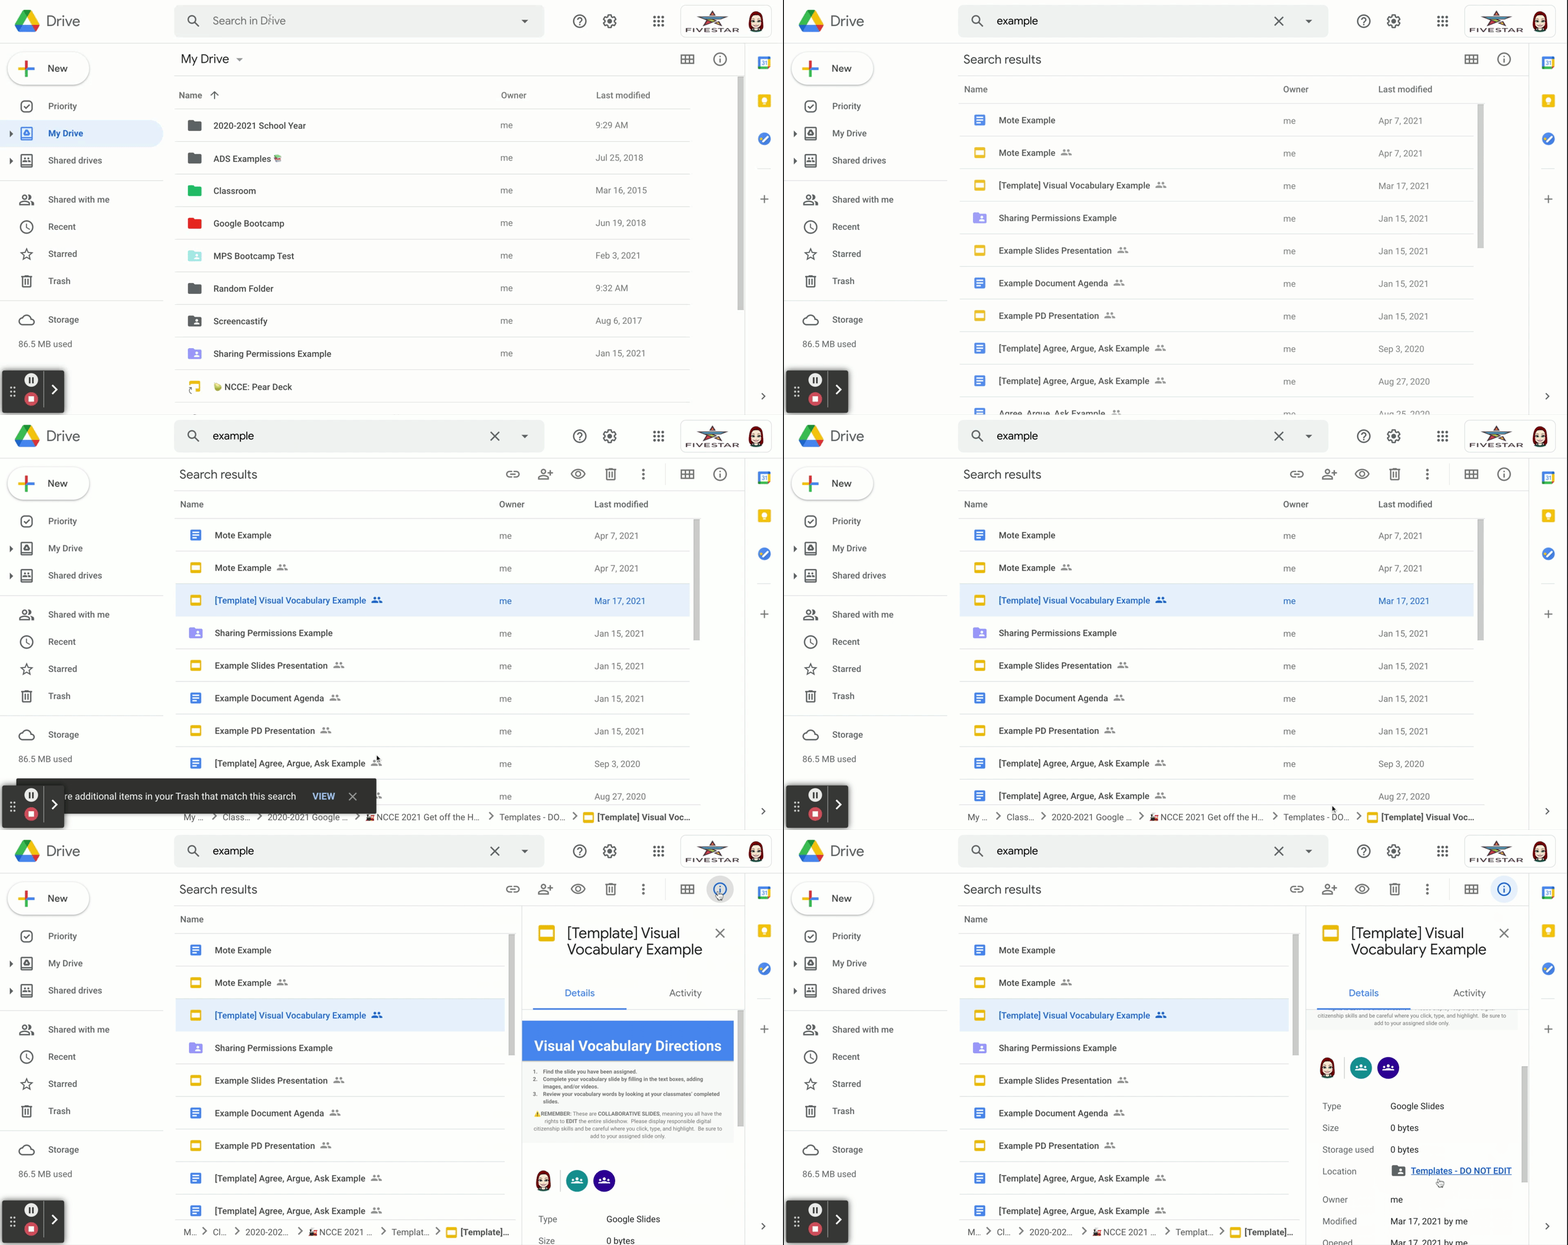
5. Use the power of Google search right inside your Google Drive! If it comes down to it, and you really can’t find items you are looking for and it seems like they might be lost in the depths of your Google Drive, don’t forget to use the advanced search options at the top of Google Drive. Follow along here!
You can also quickly discover the location of a certain file or folder after searching for it by looking at the organizational path, or the Drive “breadcrumb trail,” at the bottom of your screen or by selecting the file and clicking on the information “i” in the upper right corner of Drive.
Remember: you made such a dedicated effort to create and develop effective digital learning materials for your students. While it might seem daunting at first, making time to organize your Google Drive now will save you endless hours in the future. 2021-2022 Educator You will be grateful for the ease of finding and reusing those digital lessons again!
Google Classroom Digital Cleanup
One other digital space you will want to spend some time organizing and cleaning out is your Google Classroom. Not only will this help you feel less overwhelmed and disorganized heading into the next school year, but these tips will also make your students’ lives easier as well. Here are a few Classroom clean-up tips to get you started!
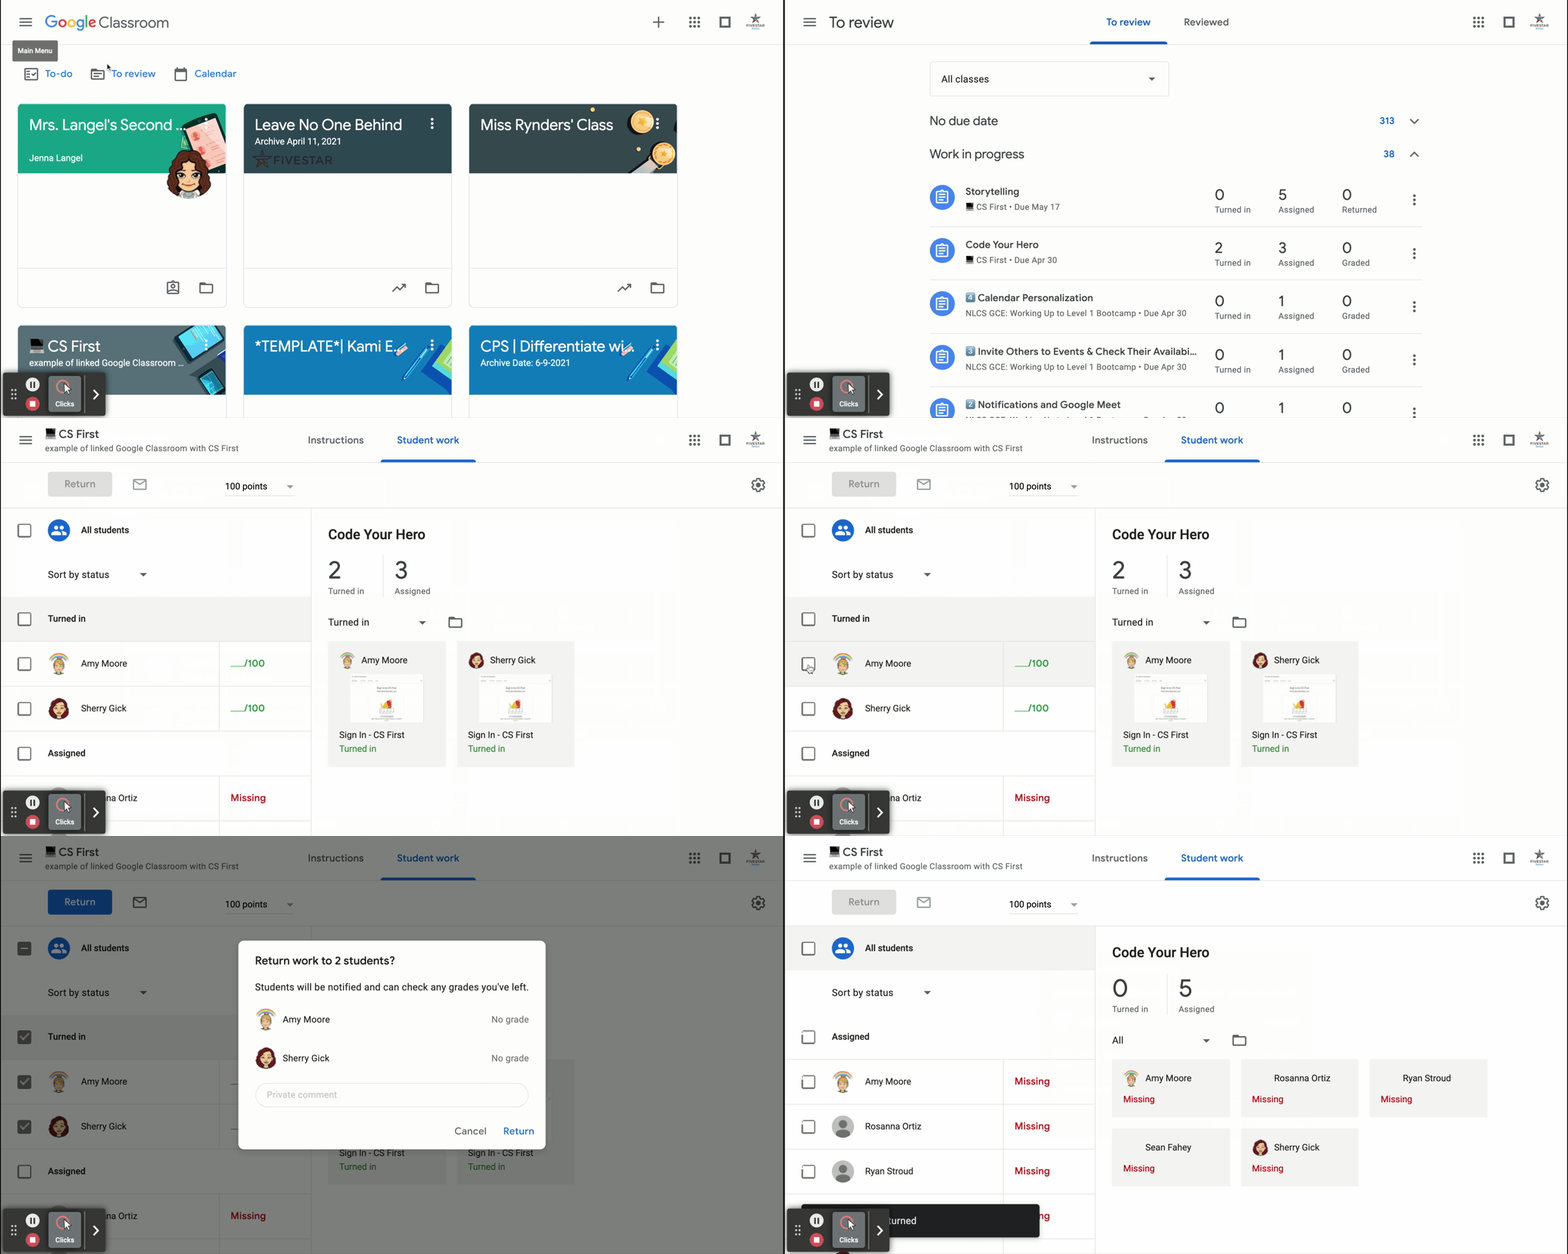
1. Return all student work. By returning student work to students, Google will reassign ownership of the documents to the students. This is especially helpful as you are cleaning up your Drive and want to delete old files as previously discussed. If you delete student work but are still the owner of the work, you are really deleting the file for both you and the student. However, if you have returned the files, deleting them will remove them from your Drive but allow them to still be accessible to the students. This will greatly reduce the number of files you see in “Shared With Me.” You can easily find any assignments that have been turned in, but not yet returned by clicking on “To Review” at the top of your Google Classroom homepage.
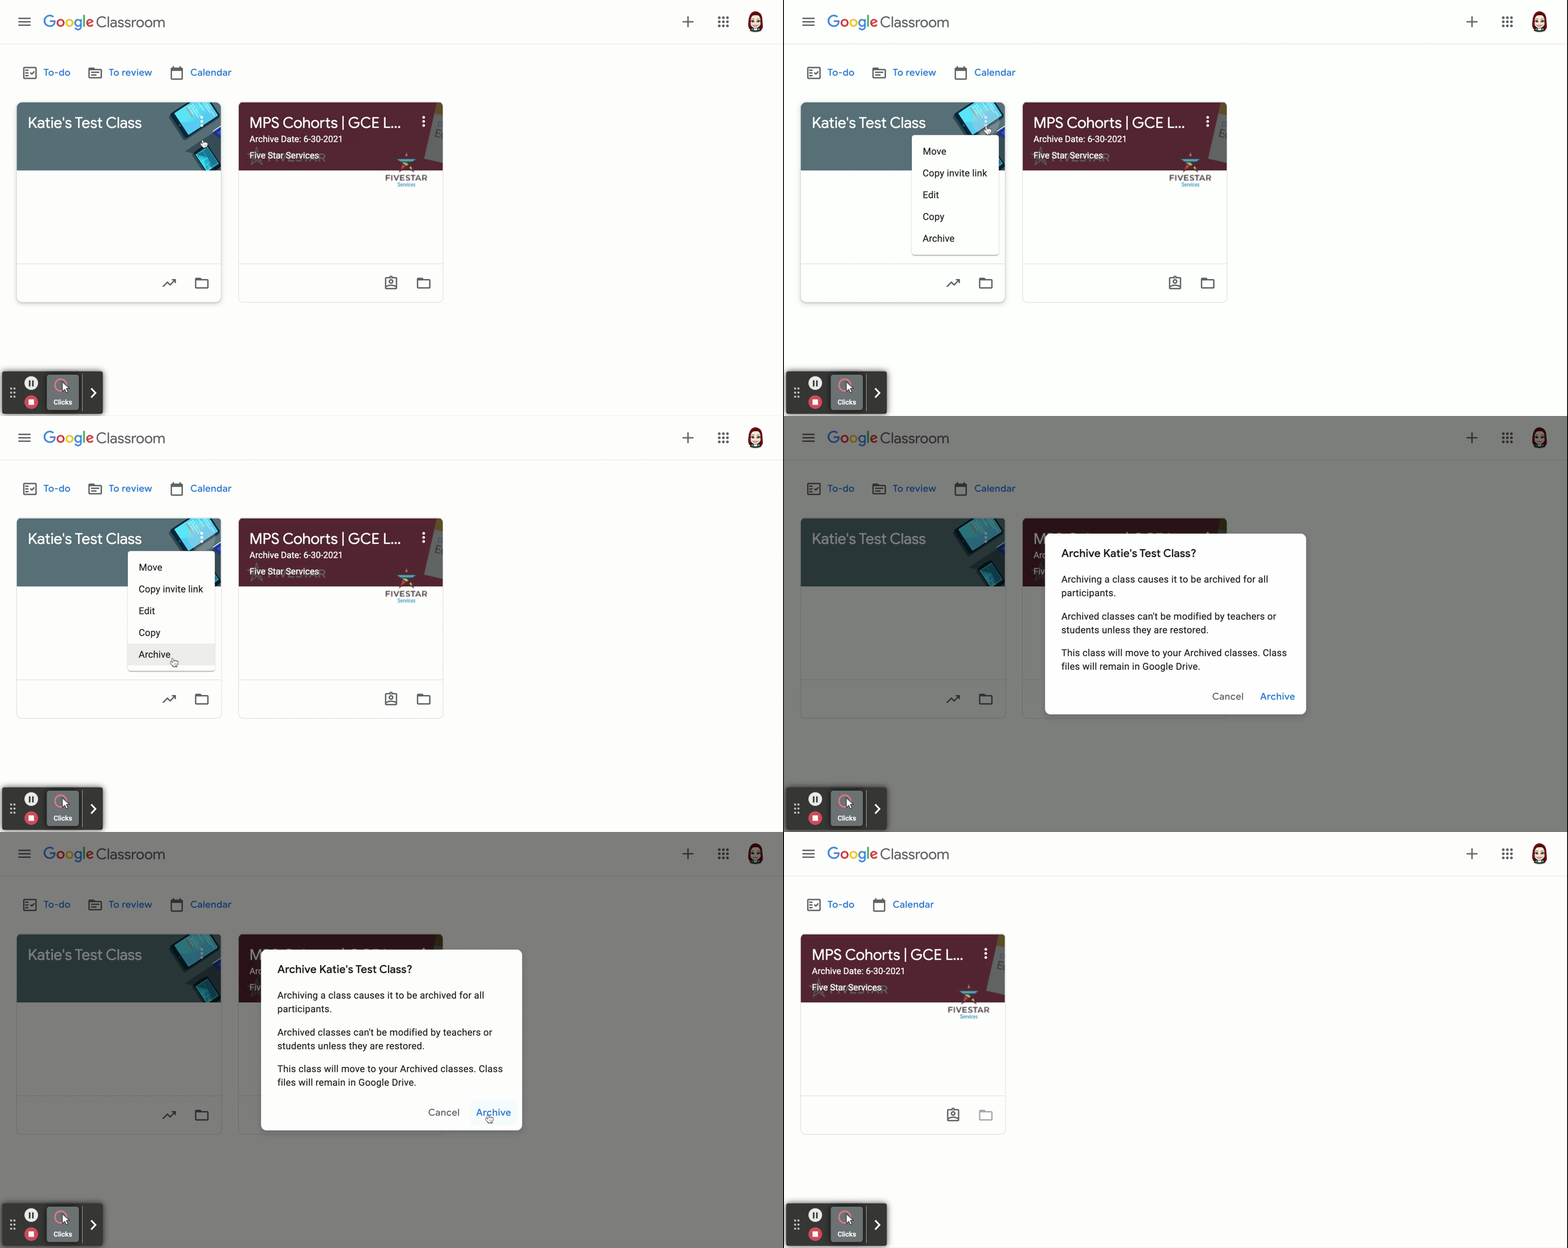
2. Archive last year’s Google Classrooms. This is not the same as deleting a class! Archiving your Classrooms will remove the class from your main Classroom homepage, making the homepage less cluttered and easier to navigate. Not only does it help clean up your Classroom homepage, but it will also remove the Classroom from your students’ view as well. Archiving also freezes the class so no new changes can be made to it. This stops students from continuing to post and comment on items in the Stream and on the Classwork page. And the great thing about archiving classes is you and any co-teachers are still able to copy and reuse old posts and assignments in Classrooms of the future!
If you need to access your Archived classes or restore any classes that have been previously archived, you can do so by going to the main menu in Google Classroom, scrolling down, and clicking on “Archived classes.”
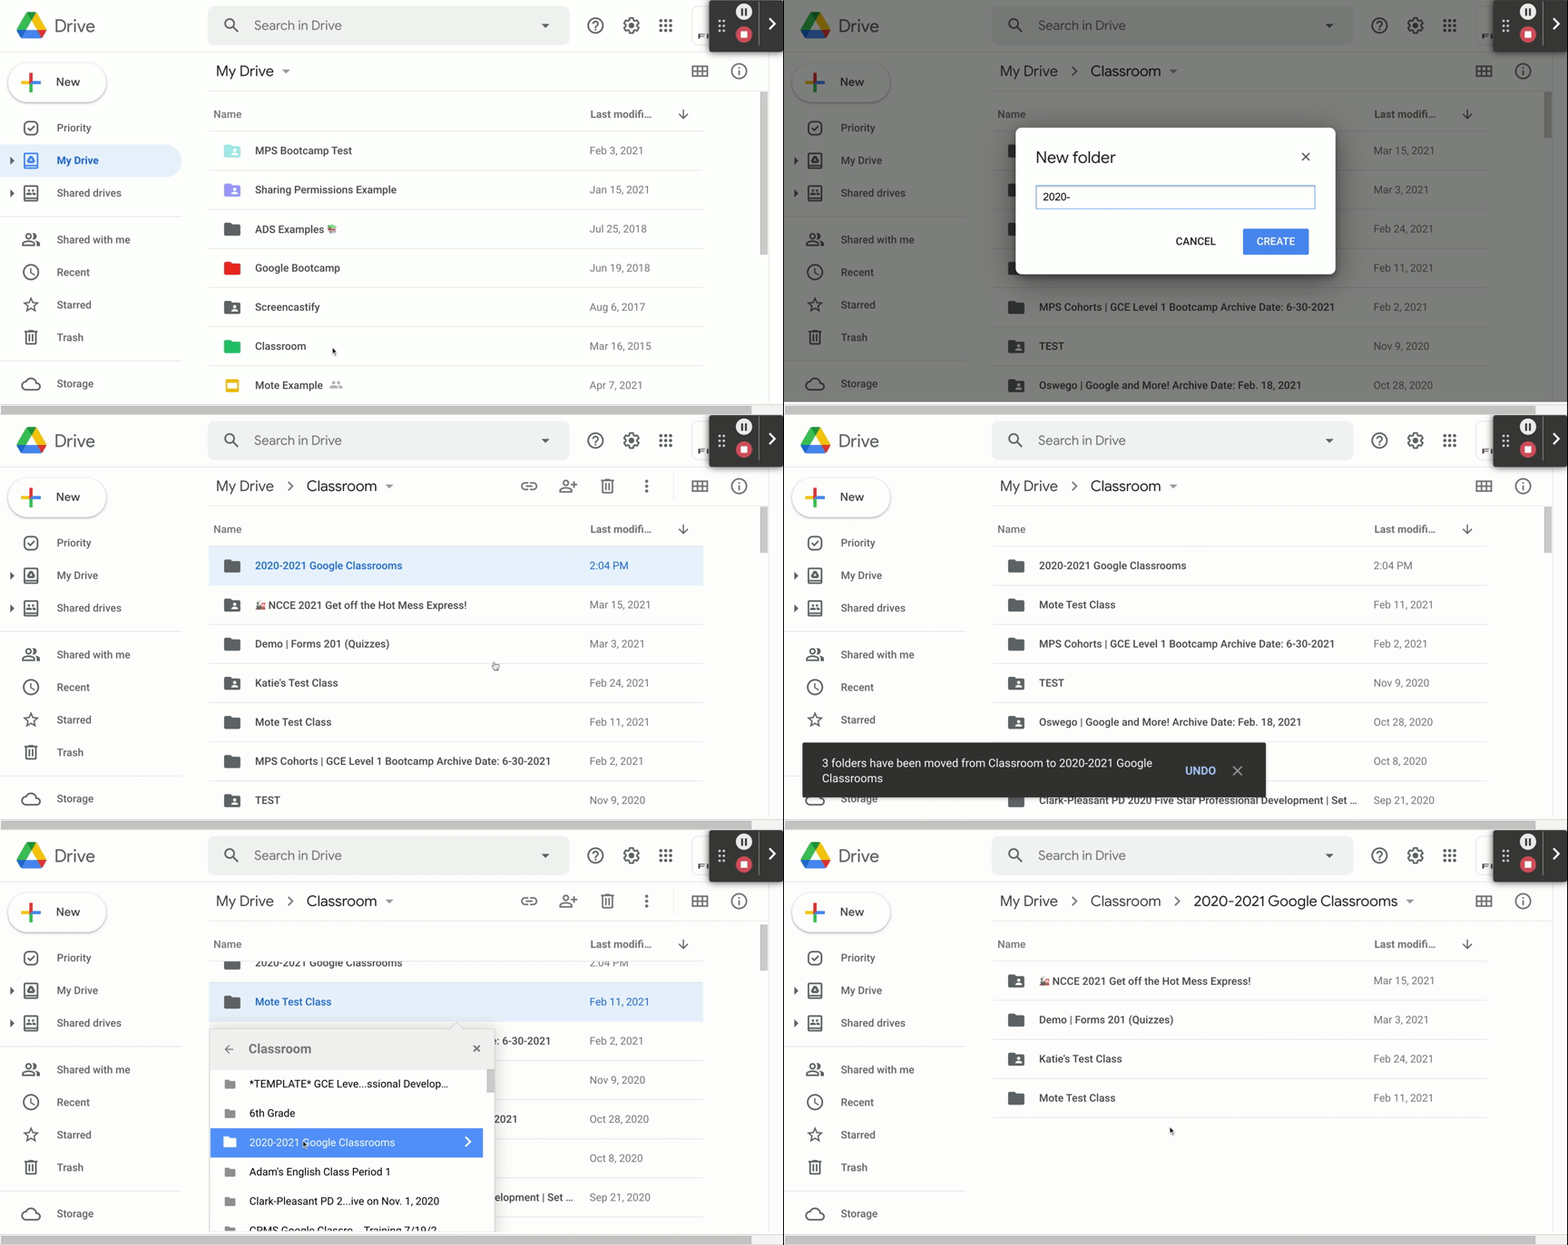
3. Organize Google Classroom folders in Google Drive. One of the best things about using Google Classroom is the automation that happens within Google Drive. Whether you are aware of it or not, for every class you create in Google Classroom, a folder is created in your Google Drive where all of that class’s assignment documents and other files are stored. It’s possible you have never opened the “Classroom” folder in your Google Drive that holds all of the class folders, so it’s likely it is very cluttered and disorganized. Using some of the Drive organization tips you learned above, you can apply those to this folder as well. Inside of the folder titled “Classroom” in your Google Drive, create a new folder for archived classes or with a title of the school year. For example: 2020-2021 Archived Google Classrooms. Then, you are able to easily move any archived classrooms or test classes to this folder.
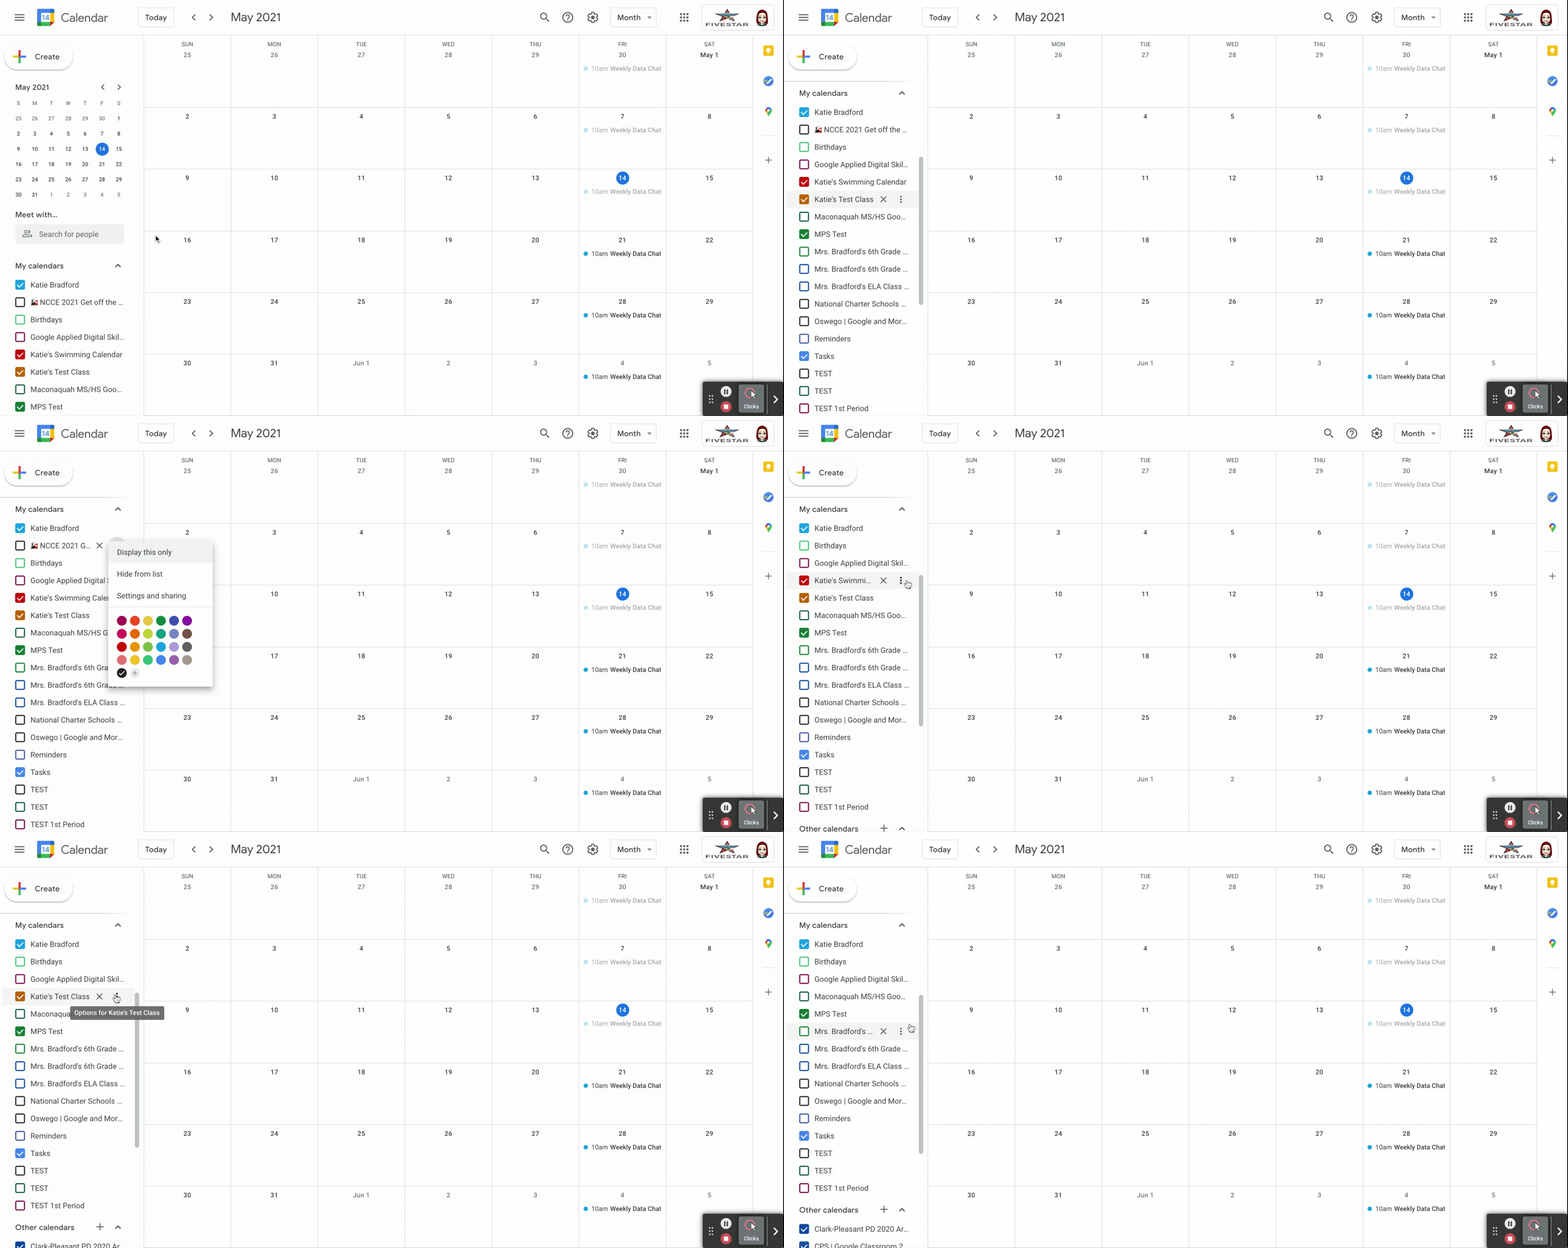
4. Remove past Google Classrooms from Google Calendar. If you are a Google Calendar user, you’ll notice any Classroom you have created or joined will automatically be added to your list of visible calendars in Google Calendar. Depending on how many classes you’ve been a part of, this list might be incredibly long and cluttered. At the end of each school year, you can easily hide those calendars to clean up the view of Google Calendar. You also have the ability to fully remove the calendars by clicking on the “X” and then selecting “Remove calendar.” While this action will delete access to this specific Google Classroom calendar, it does not delete or remove anything from the actual Classroom itself.
Although Google Drive and Google Classroom may have been some of your heavy lifters when it comes to digital learning spaces, don’t forget to clean up any additional tools you may have leaned on as well. Resources like Dropbox, Seesaw, Screencastify, Pear Deck, Flipgrid, and other online classroom spaces can benefit from these organizational suggestions too. Whatever level of cleanup you decide to engage in before a summer of rest and relaxation, know those digital resources that sparked learning and joy will be there ready and waiting to save you lesson prep time in the future!

